Sunday, November 28, 2010

Sunday Game Day Snack - Corn Nuggets!


I LOVE corn nuggets. LOVE LOVE LOVE. When I first saw them in a food establishment near me, I was hesitant to try them. I am not a fan of creamed corn...so I bypassed them.

But one day, something in my mind just said... TRY THE CORN NUGGETS. So I did. And fell in love with the deep fried bits of goodness. I could seriously just eat a whole plate of them for dinner and that's it.

So while my husband and I were shopping for Thanksgiving, all canned veggies were on sale and he spied creamed corn. He purchased a can for himself one night for dinner, but I had other ideas. I wanted to try and make corn nuggets.

This is what I did today. I actually tried two recipes, as one of the ones I found was getting bad reviews. But in the end - it was that one that I liked the best.

These would have been even better if I actually had a mini deep fryer... or if I made them smaller (these are like, ginormous corn nuggets) but they still tasted delicious, and they are perfect for hungry game day patrons to munch on.

The first recipe I tried was this...and my nuggets came out more like fritters and they weren't gooey and creamy inside like a corn nugget should be.
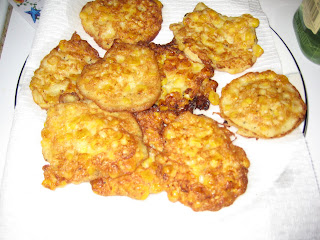

The second one I tried - the one people were hating on - was this one. The recipe wasn't flawless, and I had to make a few changes on my feet, but it came out well. The only problem was that I definitely made the nuggets too big - but they cooked up just find and had the creamy center a corn nugget should have. I will post my remedied recipe below...

Ingredients:
* 1 (11 ounce) can creamed corn
* 1 (11 ounce) can whole kernel corn, drained
* 1/2 cup yellow cornmeal
* 1/2 cup all-purpose flour
* 1 egg white
* 1/2 cup milk
* salt and pepper to taste
* 3 cups vegetable oil for deep frying

Directions:

In a medium bowl, stir together the creamed corn and drained whole kernel corn.

Line a baking sheet with aluminum foil, and coat with vegetable oil or cooking spray.

Drop spoonfuls of the corn mixture onto the sheet, and freeze until firm, about 2.5 hours.

Meanwhile, mix together the cornmeal, flour, egg white, milk, salt and pepper in a medium bowl. Stir and refrigerate for an hour or two while the nuggets are freezing.

When the nuggets are ready, heat one inch of oil to 350 degrees F (175 degrees C) in a large deep skillet, or fill a deep-fryer with oil as directed by the manufacturer.

Dip frozen corn nuggets in the batter, and quickly fry in hot oil until golden brown.


Place on paper towels to drain and dry.


I found the second recipe easier as well and I feel this is a delicious fall treat! If I had these ready early in the morning, I would have packed some in tin foil and sent them with my husband to the Giants/Jaguars game he attended today. Maybe next time he wins free club seats!!

Tuesday, November 23, 2010

Cornbread Bake - my Thanksgiving dish!


So as I previously mentioned, my husband and I are celebrating Thanksgiving at his family this year, and we all need to bring a little something since his Aunt, who is hosting, is hurt and can't cook as much.

We're doing a dessert (my pie cupcakes!) but I (stupidly) offered to do something else. I say that because working full days during my crazy time at work is actually more tiring than I thought (this is my first November at this job) and when I come home, the last thing I want to do is bake or cook. And it's not like I can do any of this on Thursday morning since we have to schlep 3 hours away from the house. Luckily this recipe only took about 20 minutes to put together and then it was in the oven for a half hour. Not too bad - I did it in between watching Glee. Hopefully it came out ok!

So I found this recipe amongst the Sunday coupons of all things. Cornbread Bake. Sounded interesting - I like cornbread. Here is the recipe...

Ingredients:

2 pouches cornbread mix (6.5 oz each)
1 container of sour cream (16 oz - we used light)
2 eggs
1 cup shredded cheddar cheese
frozen sweet corn, thawed and drained (8 oz)
1/4 cup sliced scallions

Directions:

Preheat oven to 400 degrees F.

In a large bowl, stir cornbread mix, sour cream and eggs until smooth.

Add 1/2 cup cheese, corn and scallions.

Pour into greased 11 x 7 casserole dish.


Bake about 35 minutes or until toothpick inserted in the middle comes out clean.

Sprinkle with remaining 1/2 cup cheese before serving.


I had to tweak this a bit - since I was baking this 2 days prior, I actually baked it for 15 minutes and then sprinkled the remaining cheese on to bake for the next 15 minutes. It looks great though!

This recipe actually also included a jar of chopped pimentos but we just weren't into that. I could had substituted another vegetable or something but I left it at corn and scallions. I also used a mixture of white and yellow corn.

I hope my husband's family is excited to eat this - and will like it!!

Sunday, November 21, 2010

Chicken & Biscuits with Gravy - My "Southern" Cooking


Soooo...I am not Southern. Nope. I was born in the Northeast and have always lived in the Northeast. Well...my college WAS below the Mason Dixon line, but DC doesn't quite count. But, the other night I attempted to make a "Southern" dish, and it came out pretty tasty, if I do say so myself.

Granted, I do know if any true Southerner tried my dinner, they would give me 400 ways it could be improved upon. But my husband and I found it delicious and we were satisfied as mere Northerners.

We had a can of biscuits in the fridge that had to be used, and I recently found 1/2 pound of ground chicken tucked away in our freezer that we must have forgotten about. So, I decided to put the two together and make dinner.

As soon as I typed those two ingredients into google, of course a million biscuits and gravy results popped up. I picked this one because it looked tasty, yet simple enough to make in a short amount of time. I also know this girl took a traditional (kinda fatty) recipe and made it healthy. I like that!! :-)

This recipe will serve 2.

Ingredients:

4 fresh buttermilk biscuits, sliced
olive oil (for skillet)
ground chicken
1/4 cup flour
3/4 tsp salt for gravy.....
1/4 tsp salt for ground chicken
3/4 tsp black pepper for gravy.....
1/4 black pepper for chicken
1/4 tsp parsley flakes for gravy.....
1/2 tsp ground parsley for chicken
1 1/2 cup milk
1/8 tsp paprika
1/8 tsp brown sugar

Directions:

Ground chicken first!!

In a bowl, mix all your dry ingredients and then add the ground chicken. Mash everything together well, and put into a skillet with a little oil.

Make sure the chicken gets broken up into crumbles and cook until lightly browned - set aside.


Then make your gravy!!

Whisk all of the dry ingredients in a small bowl, then slowly whisk in the milk. Transfer the mixture to a small saucepan and heat to a simmer, whisking constantly. Once simmering, lower the heat and whisk until thick.


Put the chicken back on the heat and pour the gravy over it, mix until well combined and remove from heat.


Pour the chicken/gravy mixture over the biscuits and serve.

I changed the recipe just slightly because the girl used sage and I had none of that so I just used parsley. I also sprinkled some crushed red pepper flakes into the gravy at the end for some more flavor.

It was pretty tasty, and something different for us to do with the ground chicken.

Stuffing Muffins


This month's "special" in the Food Network Magazine was stuffing. I LOVE stuffing. It's my favorite Thanksgiving foods. One thing in particular caught my eye - stuffing muffins.

I decided to try and make them. The goal from the Food Network Magazine was to obviously make a base stuffing from scratch. This would be a GREAT idea and I would love to do this, but I was a little pressed for time when I wanted to cook these.

Being that it is November, and for anyone out there who has benefits from work - you know it is open enrollment time. For someone who works in HR - this is an incredibly busy time of year and you are working earlier hours or staying late and by the time you get home, you are so tired from answering a zillion questions about medical insurance, vision, dental, etc. So...I cheated on the recipe. :-) I used Stove Top stuffing.

So... here is what I did.

I bought Stove Top stuffing mix - the cornbread flavor - and I made it according to directions.

Once I mixed the stuffing mix into the boiling water, I also added some dried cranberries and some almond slivers. I let it sit for just a minute or two.

Then I lined a muffin tin with baking cups, plopped some stuffing into each cup, and baked it at 350 degrees F for about 35 minutes.

The stuffing should have a browner look to it and be more solidified in the cup.

Honestly, there is nothing "special" about this recipe besides a fun name - it's just baked stuffing. But at least it is a cute presentation - little stuffing cups to put on the table at Thanksgiving. I would feel the same way even if I made homemade stuffing - it still would just be stuffing in a little cup.

But, at least it is a fun and different way to present this traditional side dish.

What's your favorite stuffing recipe, or way to eat it??

Sunday Game Day Snack - Open Face Knish Sandwiches!


Today's Sunday Game Day Snack is a hearty one, and VERY delicious, as my husband and I just tested out. Open face knish sandwiches. YUM-MY!

My husband originally saw something like this concept on the Food Network and desperately wanted to try it. So today when I went food shopping, there were some knish's on sale and I plopped them in the cart.

We planned to use turkey and cheese on top of a sliced knish. You can definitely use any type of deli meat you enjoy, accompanied by any type of cheese or additional vegetables - the possibilities are endless!

The knish's we bought happened to be potato broccoli, mostly because those were the ones on sale and we didn't want to buy something that cost more since this was an experiment and we really don't eat knish's very often at home.

We also purchased some plain, thin-sliced deli turkey and light Swiss cheese (also thin-sliced).

We got home around 12:30 so just decided to go ahead and make these for the start of the 1 pm Jet game and eat a late lunch/early snack.

I sliced the knish in half so I had 2 "sandwich ends." Then I shredded some of the sliced turkey and put it on top of the potato filling, topped by a slice of Swiss cheese.


They baked about 20 minutes until the cheese started to get a slight golden color on top and the potato filling was hot.

The sandwich was yummy plain (as I ate it), and my husband decided to add some spicy mustard to his, which he also really enjoyed.

Since we ate them for lunch we each had two sides, but if we were using this as a snack we would have just split one. They are very easy to make, very filling and very tasty.

Happy Football Day!

Monday, November 15, 2010

Black and White Cookies...


One of my FAVORITE treats are black & white cookies. They are just amazing! But they have to be done right - I like then they are soft. I was once at a wedding where they served black & white cookies but the cookie part was crunchy and it seemed fake to me. Black & white cookies should almost be like a cake.

Anyway, I just had to talk about the ultimate black & white cookie that my husband and I just had in Orlando, FL.

In Universal Studios, there is a little bakery called Boulangerie, with delicious looking desserts inside. But this one treat caught my eye, and they called it the Othello.

It was a monster black & white cookie with chocolate shavings on the top. !!! No words.

We ordered it and dove in. Usually, I like the chocolate part better than the white part of the cookies but this time, the white chocolate took the cake. Literally. YUM!

Needless to say the 2 of us devoured this delicious treat rather quickly. It was a lovely little afternoon snack!

Stay tuned - later this week will be an interesting take on stuffing for Thanksgiving!

Sunday, November 14, 2010

Pumpkin Pie Cupcakes - Great Thanksgiving Dessert!


It's my husband's "year" for Thanksgiving, meaning we will be joining his family for the holiday this year. This means we get to drive 3 hours away and there will be something like 22 people there. It's a far cry from the Thanksgiving with my family, where there are maybe 10 people and it's less than 10 minutes away from my house. But, it must be done.

We go to my husband's Aunt's house and this year everyone needs to pitch in a little bit more because this poor woman tore her Achilles Tendon over the summer and can't really stand long enough to do much cooking. She asked us to do a dessert, which is fine, because I was thinking of doing that anyway.

I saw THIS recipe about a month back and thought it looked intriguing. Not particularly for me, because I HATE pumpkin, but my husband loves it and so do some members of his family. This recipe was different for sure, so I tested it out this past weekend.

The girl who made up this recipe is obviously a much better baker than I am and she made the cupcakes from scratch. I didn't! I had to cheat and use cake mix (it's just easier for me) but I did add some special touches of my own. Once they were completed I had my husband taste test them as well as my neighbors. They fared well, so I will definitely make them to bring up to Thanksgiving.

Here is what I used and how I made the cupcakes...

Ingredients:

Pre-made refrigerated pie crust dough
Pure pumpkin (15 oz)
Evaporated milk
ground cinnamon
ground ginger
ground cloves
3/4 cup sugar
pinch of salt
2 eggs
Cake mix (or your favorite recipe to make cupcakes from scratch)
3 more eggs (based on my cake mix)
applesauce
water
marshmallow fluff
frosting

Directions:

Preheat oven to 450 degrees F.

Take a mini cupcake pan and gently spray each cup.

Roll out your dough and cut circles that can cover the cup in the pan - bottom and sides. Like the girl from the original recipe suggested, I used a small juice glass opening and it turned out to be the perfect size.

Line the cups with the circles of dough.

Prepare your filling - I use Libby's pure pumpkin and the recipe for the pumpkin mix is right on the can but you mix all the dry ingredients (sugar, cloves, cinnamon, ginger and a pinch of salt). Then you add the pumpkin and the eggs - well beaten. Slowly add in the evaporated milk and stir until smooth.

Fill your little pie cups - only halfway since they will expand as they cook. But if you want bigger "pie bites" fill them up!

Bake these for 7 minutes at 425 degrees F, and then lower the oven to 350 degrees F and bake them for another 10 minutes or so, until the crust is brown and the filling is completely set.


Take them out of the oven and let them cool on a wire rack in the muffin pan...once cool, take them out and set them aside as you make your cupcake batter.

In my case, I just used boxed cake mix. I used white cake and mixed the eggs and water in, along with the applesauce. I prefer to use applesauce instead of the oil they recommend, because it's a little healthier and lighter. I use the exact same amount of applesauce for the amount of oil they ask for.

Once the batter was whipped up, I sprinkled in some cinnamon and nutmeg for a little extra flavor - but not overwhelmingly so.

Line regular muffin pans with baking cups. Put 1 tablespoon of batter in the bottom of each cup and then gently put a pie bite in the middle. Do not press the pie bite down to the bottom.

Put another heaping tablespoon of cupcake batter in each cup - make sure the pie bite is completely covered.

Bake at 350 degrees F for about 25 minutes until cupcakes are golden brown. Remove them from the oven and let them cool.

Once my cupcakes were cooled, I used marshmallow fluff as my "icing" and smeared it on the top of each cupcake.

I then mixed plain white frosting with unsweetened cocoa powder and yellow food coloring to get a tan effect and used a piping bag to make the top of the cupcake look like a little pie.

On some cupcakes, I placed a candied pecan on the top.

I really hope my husband's family will enjoy these little creations!

I also made some "cherry" pies the same way, using cherry pie filling in the pie bites instead of pumpkin. They came out well, and I just used regular frosting on top - no marshmallow fluff. I will also be making a batch of some sort of fruit pie for Thanksgiving for the non pumpkin eaters like myself. I am just trying to decide between blueberry pies and strawberry pies.

I wish I had the talents of the girl who made this original recipe - they were so fancy - but as I previously mentioned, my husband is the baker in the family. While his shoulder is recuperating, I am filling in, and people will have to make due with plain old cake mix :-)

Happy Thanksgiving Cooking everyone!!

Sunday Game Day Snack - Quick and Easy


My quest for quick and easy Sunday Game Day snacks continues as I threw something together for my husband in about 20 minutes today.

We had some crescent rolls lying around, and that Laughing Cow spreadable cheese. Throw in a few vegetables and you have yourself a quick, tasty snack.

Here are the ingredients:

Tube of Crescent Rolls
Laughing Cow Spreadable Cheese (I used the Light Garlic and Herb flavor because that is what we have in the house)
Green pepper
Onion
Dried Parsley Flakes
Shredded Parmesan cheese
Crushed Red Pepper Flakes


I unrolled the crescent rolls and spread some of the cheese on. Then I dropped some diced peppers and onion on top of that and rolled up the crescent roll. Once they were all assembled, I lightly sprayed them with some olive oil spray and sprinkled some parsley flakes on top. I also sprinkled some freshly shredded Parmesan cheese and on some of them (because my husband likes a little kick), some crushed red pepper flakes.


Pop them in the oven for 11 minutes and you have a filling snack to munch on during halftime.

Enjoy!

Saturday, November 13, 2010

A Taste of Harry Potter...Butterbeer!


Aaaannd I'm back after another short absence. Sorry about that, folks. Anyway, today's post is a little whimsical, based on the recent trip my husband and I took to Universal Studios in Orlando, FL. I am a HUGE Harry Potter fan (yes, adults can be fans) and I was very anxious to check out the new Harry Potter area (which, btw, was AWESOME).

I was very interested to see how Universal brought one of the Hogsmeade staples in the book, Butterbeer, to life, and we stopped at the Butterbeer truck around 10:45 in the morning. (FYI, it's not really beer, obviously!)

We had a choice of frozen Butterbeer or regular (which was like a soda). Being that it was a cool morning in Florida, we chose regular. The fizzy drink was poured into my very own Butterbeer mug and topped with something white and foamy.

It was delicious! The soda part was honestly very much like cream soda with a little butterscotch added to it - but the intriguing part was the foam. We had no idea what it was, but it kept growing as you drank your Butterbeer (magic?)

It was definitely something fun to drink and my husband, who usually complains that sida hurts his stomach, was fine and loved it until a little bug decided to fly into his drink and he dumped it out in the bushes of Dr. Suess-Land. (lovely).

I finished all of mine :-)

If you are a Harry Potter fan, definitely go check out the area - you can eat at the Three Broomsticks or get some pumpkin juice. (Non fans, if you are dragged there, no worries, there is plenty of beer and other alcohol available for you to consume and tolerate the Potter craziness).

I found this recipe on FoodNetwork's website for "butterbeer" that may be similar if you want to try and create your own as well!

Stay tuned for some other delicious posts from Orlando as well.

Saturday, November 6, 2010

Sunday Game Day Snack...On The Go!!


This week's Sunday Game Day Snack was totally improvised in a few minutes. My husband and I were down in South Florida at my in-laws vacation house this past weekend. Since there is a full kitchen, I knew there would be an opportunity to make something. We didn't want to buy too many ingredients though, since we were only going to be around for a few days.

As we were walking through the Super Target, the new Wheat Thins Flatbreads caught my eye and they were on sale for just $2.00. An idea began to form in my head and from that I ended up making little Flatbread bites!

This "recipe" took all of 10 minutes to throw together. I ended up microwaving them, but if you are by a grill, you can place them on tin foil and let them heat up for a few minutes until the cheese melts.

Here are the ingredients:
Wheat Thins Flatbreads - Tuscan Herb flavor
1/8 pound sharp white cheddar cheese
diced green pepper
diced shallot
Bulls Eye BBQ Sauce
Cream Cheese

I made a few different combinations of cracker... on some, I spread BBQ sauce and topped it with the cheese, pepper and shallot. One others I spread cream cheese and topped it with cheese, shallot and pepper. Some I just used cheese, pepper and shallot without a sauce and there was also the possibility to combine the BBQ sauce and cream cheese before topping that with the remaining ingredients.


Once I had my crackers assembled, I popped them in the microwave for 20 seconds.

Done! An easy and tasty game day snack on the go!

This snack ended up being very healthy and incredibly tasty at the same time!! It's also a good snack if you are on vacation and have a hotel room or a time share with a kitchen. It was very inexpensive too - the crackers cost me $2.00, the cheese I used (1/8 pound) was all of 85 cents, the green pepper was 89 cents and my little shallot was 9 cents!! We also had a little cup of cream cheese from breakfast that we didn't eat at the restaurant so we took it home, and a little cup of BBQ sauce that was free at a condiment station from where we had lunch.

Enjoy game day!!

Wednesday, November 3, 2010

Another Faux Steakhouse Dinner


When food shopping last weekend, there was steak on sale so we grabbed a new cut to try. And of course, I forgot to write down the cut it was... but it was OK. I think my favorite is skirt steak, and this wasn't it!

Anyway, my husband found an interesting marinade to try here... and we changed it just a bit.

First off, we didn't use onions because we had a lot of other sides already made in the house to choose from.

Second, we didn't use Dijon mustard because we forgot we ran out. So, we only used honey mustard, but less of it, and we only used like, a half a tablespoon of honey.

So here is what our final recipe looked like for the marinade:
1/3 cup honey mustard
1 tablespoon parsley leaves, chopped
1/2 tablespoon honey
1 tablespoon cider vinegar
1 tablespoon water
1/8 teaspoon red hot pepper sauce
1/8 teaspoon black pepper

BUT we weren't done. My husband actually mixed those ingredients before I got home from work..and then I tasted it. I felt it was a little harsh.. I really like sweeter marinades the best.

So, I dumped in about a tablespoon of balsamic vinegar and a tablespoon of this Trader Joes Sesame Ginger vinaigrette we had in the house and it was really good!

So we brushed the glaze on the raw steak and let it grill on the stove. One of the pieces of steak was a lot thinner and got a little tough in the cooking process. But the other was just fine.

The glaze wasn't our favorite but it was tasty for sure. We paired it with the creamy mashed cauliflower I make as well as the balsamic glazed sweet potatoes that I love.

Another delicious steak dinner. And I swear, we really don't eat red meat every single day!! Ha ha!

Tuesday, November 2, 2010

A's Sweet n' Sticky Spareribs!!


So, we had some spareribs in our freezer for a few months. We had bought them in the spring to grill, but then my husband had his shoulder surgery and we kind of forgot about them.

So, I needed to figure something out before they were totally freezer burned. I'd never cooked spareribs before, but I knew I wanted them cooked somewhat low and slow so they'd be nice and tender.

I'm a big fan of savory sweet sauces so I did some research and I came up with an incredibly tasty marinade!

First, though, I slapped my defrosted spareribs in a baking pan that was slightly greased and covered it with tin foil. My spareribs then baked at 350 degrees F for 1-1/4 hours. You can go about 10-15 minutes longer if you want too.

While that was baking, I started on my marinade. Here are the ingredients:

3/4 cups ketchup
1/2 cup cider vinegar
3/4 cup brown sugar
1/4 cup water
1/4 cup soy sauce
1 tsp ginger
1/2 tsp salt
1/4 tsp pepper
1/2 tsp garlic

Gently heat all ingredients in a sauce pan to just a boil.

Once the ribs are done baking, remove them from the oven, drain the pan, and return the ribs to the pan. Pour marinade over the ribs and return them to the oven and bake uncovered for 35 minutes, or until sauce covers the ribs, basting occasionally.

Then, enjoy!!

We had some sour cream and chive potatoes as a side, and have a stack of napkins around you because these will get messy!!

Monday, November 1, 2010

Cherry-Mango Chicken!


Well, my parents went on vacation and came back with this mango spread for my husband and I to eat...but we didn't know what to do with it.

A few days after they gave that to us, my husband and I were at a fair and bought this incredibly delicious tart cherry jam.

Once I got home - I decided to use both spreads in a chicken dish and made cherry-mango chicken!!

I decided to use chicken tenderloins instead of breasts of chicken, and I used brown rice as my base and poured the chicken and cherry-mango mixture over it.

Here is how I made my cherry-mango glaze...

Ingredients

2 tablespoons cooking oil
salt to taste
1 small onion, diced
2 cloves garlic, minced
a few tablespoons of tart cherry jam (to taste)
a few tablespoons of mango chutney (to taste - you can also use frozen mango chunks)
2 cups Sprite
1/4 cup fresh lemon juice, or to taste
2 tablespoons brown sugar

Directions

Heat the oil in a large, deep skillet over medium heat.

Sprinkle salt over both sides of each piece of chicken; cook the chicken in the hot oil until browned on both sides, but still slightly pink in the center, 3 to 5 minutes per side.

Remove chicken to a plate and set aside.

Add the onion and garlic to the remaining oil in the skillet; cook and stir until the onion is tender and beginning to brown, 5 to 7 minutes.

Stir the cherry and mango into the mixture; cook and stir until the liquid in the pan is slightly thickened, 3 to 5 minutes.

Add the Sprite, lemon juice, and brown sugar to the mixture; stir and return to a simmer.

Return the chicken to the pan. Ladle some of the sauce over the chicken to cover.


Return the mixture to a simmer and cook until the liquid thickens and the chicken is no longer pink in the center and the juices run clear, about 10 minutes.

***Don't reduce the liquid too much-you'll want enough for serving over the chicken and rice!

The dish was decent... I am not a HUGE mango person so I probably would have just loved cherry chicken - maybe next time!!