Tuesday, September 28, 2010

Eating With A Travels...to Walt Disney World, FL!


OK, OK...so Disney World isn't exotic. But it IS a really fun place to visit and I love it. AND, my favorite place to eat there is located in MGM...er...I mean, Disney Hollywood Studios. (I hate the new name, it will always be MGM to me).

I'm talking about the 50's Prime Time Cafe. This place serves awesome food in huge portions and has such a fun atmosphere. It's American comfort food in a TV themed setting...and it feels like home! All of the tables are in "rooms" that are designed to look like kitchens from the 50's. There is a TV at each table playing scenes from 50's TV shows as well as news clips and commercials. The waiters and waitresses are "mom" and "dad" and yell at you to clean your plate, elbows off the table, and ask you how your day is going.


The first time I was there was when I was 16 with my parents and one of my friends. We had a blast and finished off our meals with s'mores. This plates of s'mores is like NOTHING you have ever seen before...the entire plate is full of a large graham cracker covered in perfectly placed marshmallows and chocolate. YUM!!

When I was 18, 3 friends and I were allowed to go to Disney by ourselves for our February school break and I dragged my friends there the day we went to MGM. This time I got in trouble for being sassy and had to stand in the corner for a minute. We have pictures. Of course, I finished off my meal with s'mores.

I went again during a college spring break when I was 20...and then not again until I was 29 with my husband when we went on out mini-honeymoon. However, that time I actually ordered something different... my husband got the s'mores and I got the 50's Boston Cream Cupcake!!

Oh my, that was delicious. It was this HUUUUGGE cupcake full of delicious boston cream filling. Two thumbs up!

I should probably also talk about their entrees - which are amazing. The fried chicken, to me, is worthy enough to stand up to good ol' southern cooking. The pot pies are so scrumptious and honestly, I feel like you can't go wrong with most of the menu. It's just old fashioned cooking in the middle of Disney.

I can't wait until the next time I go back - that is the one restaurant that is always on my list.

But make your reservations early! This place, like all Disney restaurants, fills up fast. You can make dining reservations up to 90 days before your visit so if you know you are going to Disney - call the reservations number and just get in the places you want - even if you don't know what days you will be in each park. At least you will have a spot in a restaurant and as things get closer and you have more of a plan, you can try to change it.

Have a magical day!

Saturday, September 25, 2010

Temporary interruption

Hi out there - my beloved MacBook decided to die this morning (I'm borrowing my husband's computer). Anyway, after an emergency trip to the Apple store, I have purchased a new computer but won't have it till Monday. They kept it at the store with my old computer so everything can be transferred over.

Therefore, there will unfortunately be no game day snack this Sunday and posts will resume next week.

Please come back!

Friday, September 24, 2010

Crispy Pretzel Coated Chicken


The following recipe was actually a suggestion from my friend Lynda. When she read my honey mustard and apple chicken post the other day, she said it reminded her of this delicious chicken recipe that she got from the EatBetterAmerica.com website.

It definitely sounded interesting so I added it to my list of recipes for my Yom Kippur dinner last week. My parents and husband ended up really enjoying the way this chicken was prepared. So, thanks Lynda!! It was a great recipe and also a huge success here.

It's also really easy to make and doesn't take much time at all. Try it out!

I also know that Lynda sometimes uses half honey mustard and half spicy mustard to give this a little zing.


Prep Time:10 min
Start to Finish:30 min
makes:4 servings (I used a little more of each ingredient to cook 6 chicken breasts)

Ingredients:

4 skinless, boneless chicken breast halves
2 egg whites
2 tablespoons honey mustard
1 1/2 cups mini pretzels, crushed (about 1 cup)
1/4 cup grated Parmigiano-Reggiano cheese
1/2 teaspoon dried thyme, crushed (I just used thyme I have in a spice jar)
Nonstick olive oil cooking spray

Directions:

Preheat oven to 425ºF.

Using the flat side of a meat mallet, gently pound chicken between two sheets of plastic wrap just until even thickness.

Place egg whites and mustard in a shallow dish; beat with a fork to mix.

In a larger shallow dish, combine crushed pretzels, cheese, and thyme.


Dip chicken into the egg white mixture. Press into crumb mixture to coat.


Place chicken in a single layer on an ungreased foil-lined baking sheet.

Sprinkle chicken with any remaining crumb mixture and press lightly. Coat with cooking spray.


Bake chicken, uncovered, for 14 to 18 minutes or until no longer pink (170°F).

The recipe is also good if you have leftovers - it definitely keeps for a day and crisps back up in the oven.

Enjoy!

Thursday, September 23, 2010

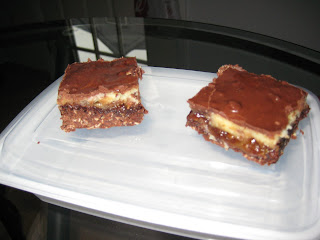
Chocolate Caramel White Chocolate Mousse Bars


Wow...that title is a mouthful, huh? Well, that's because in my quest to create one of my two desserts for Yom Kippur, I combined two recipes.

You see, I had been given a challenge by my "big brother," our close family friend whose house we were going to for Break Fast. He told me to create a dessert that was blog worthy and different.

Since I am not the baker in the family, that was a challenge for me. I searched the Internet for days and hours and nothing called to me. I had suggestions from a few friends to make bars, such as lemon or chocolate chip because they were easier to make than cookies and travel well. Some people suggested pies such as pecan or peanut butter with Oreos. They were all good suggestions but nothing called to me.

So last Friday I spent over an hour scouring my recipe books and the Internet just ONE more time to find something. One thing I settled on was my friend's idea to make a bar of some sort - I never made one before so I wanted to give it a try. I've made brownies, but only like, box mix kind. Haha. Finally, two things on the Betty Crocker website caught my eye...and I thought they would taste mighty delicious if I combined them together. The original recipes are here and here.

Here is my creation...

Ingredients:
Cake part/bottom layer
1 box Betty Crocker® SuperMoist® devil's food cake mix
3/4 cup butter or margarine, softened
1 egg
2 cups quick-cooking or old-fashioned oats

1 jar caramel sauce (won't use whole jar but have a full jar for however much you want to use)

White Chocolate Mousse Filling
3/4 cup whipping cream
1 cup white chocolate chips
3 eggs
1/3 cup sugar
1/8 teaspoon salt

Topping
1/2 cup semisweet chocolate chips
1 tablespoon shortening


Directions:

Heat oven to 350°F (325°F for dark or nonstick pan).

Generously grease bottom and sides of 13x9-inch pan with shortening or cooking spray.

In large bowl, beat cake mix, butter and egg with electric mixer on low speed until well mixed.

Stir in oats until crumbly (use fingers if necessary). ** Stir oats in a little at a time. I used close to the full amount and my feedback was a a general consensus to use less oats. They didn't ruin the dessert, but it did make it a bit heavier. I would go with less oats next time.


Press mixture in pan (use plastic wrap or waxed paper to press mixture if it is sticky).


Spread the caramel sauce on the top. Make sure you do your best to cover the entire bottom layer as it will keep the bars moist. The caramel is hard to spread but definitely try - some of my edges weren't fully covered and they turned out drier.

Meanwhile, in 1-quart saucepan, heat whipping cream and baking chips over low heat, stirring frequently, until chips are melted. Remove from heat. Cool 5 minutes.

In large bowl, beat eggs, sugar and salt with wire whisk until foamy. Pour white baking chip mixture into egg mixture, stirring constantly.

Pour filling over bottom layer and caramel layer.


Bake 28-32 minutes or until white chocolate top springs back when lightly touched and the caramel bubbles along edges.

Cool in pan on cooling rack 15 minutes and also run knife around sides of pan to loosen bars.

Meanwhile, in 1-quart saucepan, melt topping ingredients over low heat, stirring frequently.

Spread chocolate topping over bars. Refrigerate uncovered until chilled, about 2 hours.


For bars, cut into 6 rows by 6 rows.

Store covered in refrigerator.

I LOVED this recipe because I am a sucker for gooey, heavy brownie type desserts. That's my love. My mom said they were good but she prefers lighter desserts. My husband liked it but wanted less oats to make the bottom layer a little lighter.

I'm just happy it was edible. Not being a baker, it was a HUGE risk to combine two recipes blindly without knowing if it would work.

I would try it out again - but you need a good chunk of time to make these. They are definitely a rainy day stuck in the house on a Sunday type project. But to me - worth it. Yum!

My mom though, would prefer I make my Irish Cream Cheesecakes more - she proclaimed it the BEST dessert I ever made. Well, shucks.
:-)

Monday, September 20, 2010

Steak With Parmesan Spinach

This recipe is courtesy of my October 2010 Food Network Magazine!


Don't really have much of a back story for this recipe - it called out to me to make for dinner one night. I love Parmesan cheese so it just made sense to try it out. The steak was pretty good - it was just seasoned with some salt and pepper... and I added a pinch of paprika for something extra. We ended up using some steak sauce just because we aren't the biggest "dry rub" seasoning type people.

But my husband LOVED the Parmesan spinach and I thought it was pretty yummy too!

Ingredients

1 1/2 pounds flank steak
Extra-virgin olive oil, for brushing
Kosher salt and freshly ground pepper
1 1/2 tablespoons unsalted butter
1/2 onion, finely chopped
1 1/2 tablespoons all-purpose flour
1 1/2 cups whole milk
2 10-ounce packages frozen chopped spinach, thawed and squeezed dry
3/4 cup grated parmesan cheese
1/2 teaspoon grated lemon zest
1/4 teaspoon freshly grated nutmeg (I used ground nutmeg)

Directions

Heat a grill pan over medium-high heat. Pat the steak dry and brush lightly with olive oil. Season with 11/2 teaspoons salt and 2 to 3 teaspoons pepper. Cook, turning once, 10 to 13 minutes total for medium rare. Transfer the steak to a cutting board to rest, about 10 minutes.


Meanwhile, melt the butter in a medium saucepan over medium heat. Add the onion and cook until softened, about 5 minutes. Add the flour and cook, stirring, 1 minute. Remove from the heat and gradually whisk in the milk. Return to medium heat and simmer, whisking, until slightly thickened, about 2 minutes.

Stir in the spinach, 1/4 cup water, 1/2 cup Parmesan, the lemon zest and nutmeg and cook, stirring occasionally, until the sauce thickens and the spinach is tender, about 10 minutes. Thin with water, if needed. Stir in the remaining 1/4 cup Parmesan and salt to taste.


Thinly slice the steak and serve with the spinach.

Sunday, September 19, 2010

Creamy Irish Cream Cheesecake!


I've mentioned before that my husband is usually the dessert guy in the house. He bakes the cookies, pies and cakes. But since his shoulder surgery has benched him for a few months, it's been up to me - and I am not the greatest baker!!

So for Yom Kippur, I needed to make two desserts. TWO!!! I needed to make one for dinner Friday at my house and one for Break Fast on Saturday at our family friend's house. The pressure was on.

The following recipe was the one I made for Friday night for my husband and parents. The original recipe is here, and I changed it by using Irish Cream extract instead of vanilla and making mini cheesecakes instead of one big one.

The result was positive! Everyone really enjoyed these little cheesecakes, including my father who made a face when I told him it was Irish Cream. Well, he gobbled 2 of them down in no time. So without further ado, here is the recipe.

Ingredients:

15 chocolate or vanilla wafer cookies, crushed (1/2 cup)
2 packages (8 oz each) 1/3-less-fat cream cheese (Neufchâtel), softened
2/3 cup sugar
3 egg whites or 1/2 cup fat-free egg product
2 teaspoons Irish Cream extract (the extract is alcohol free, you can always use regular Irish Cream in the recipe)
2 cups lowfat vanilla yogurt
2 tablespoons all-purpose flour
1/3 cup fat-free caramel topping
Pecan halves, if desired


Directions:
Heat oven to 300°F.

Put cupcake wrappers in a muffin tin and lightly spray with a cooking spray. Fill the bottom of each wrapper with the crushed wafer crumbs - just a small coating along the bottom.


Beat cream cheese in medium bowl with electric mixer on medium speed until smooth.

Add sugar, egg whites and Irish Cream Extract. Beat on medium speed about 2 minutes or until smooth.

Add yogurt and flour. Beat on low speed until smooth.

Carefully spread batter over cookie crumbs in cupcake wrappers. Bake 1 hour.

Turn off oven; cool in oven 30 minutes with door closed. Remove from oven; cool 15 minutes.


Cover and refrigerate at least 3 hours.

Drizzle caramel topping over cheesecake. Garnish with pecan halves. Store covered in the refrigerator.


Prep Time:20 min
Start to Finish:5 hr 5 min

Sunday Game Day Snack


I know it's a little late in the day already but I'm posting today's Sunday Game Day Snack!

Today I made pizza pockets. They were very easy to make with some things I had lying around the house and my husband really enjoyed his little afternoon snack.

It took me about 10-15 minutes to put them together and then I baked them for 20 minutes. These are great for party appetizers, for people watching the game or as snacks for the kids after school.

Ingredients:
1 container of Pillsbury Crescent Ready Dough
Green pepper - diced
Onion - diced
Perdue ready to eat chicken cutlet - sliced thin
Pasta Sauce
Ricotta Cheese
Mozzarella cheese


Pillsbury has this new product called Ready Dough - it's right next to where the crescent rolls are. It's great to use because you can cut it any way you want.

I cut 6 squares and filled the middles with all my ingredients.


I then folded them into triangles and sealed the edges. I used a little olive oil spray on the top for a golden brown effect and sprinkled some Italian Seasonings on the top before sliding it into the oven.


After baking at 375 degrees F for 20 minutes they were ready to eat!

Enjoy your football games!

Saturday, September 18, 2010

Marbled Stuffed Potatoes

This recipe is courtesy of the October 2010 Food Network Magazine Issue


When I saw the following recipe in my Food Network Magazine, I couldn't wait to try it out - even though I am still not a huge sweet potato fan.

Well, the result was amazing. It was SO good - and both my husband and parents agreed and gobbled it up!!

The only bad thing about this recipe is the time it takes to make it. It's definitely an hour and a half to two hour project, so it's good for a weekend day you are home or if you have a day off. You can make this at night for the next day - I made it the day before I served them and they turned out just fine!

I used these as part of the Yom Kippur pre-fast dinner I was hosting for my husband and parents because it would be a filling component for dinner and my husband was fasting the next day for the holiday. These were definitely filling!

Here are the ingredients: (this was for a serving size of 4)

4 large russet potatoes
1 large sweet potato
1/4 cup sour cream
3 tablespoons unsalted butter, cut into pieces and softened
2 scallions, thinly sliced
3/4 cup shredded sharp cheddar cheese
Pinch of freshly grated nutmeg (I actually just used ground nutmeg I had in the spice cabinet)
Kosher salt and freshly ground pepper
Extra-virgin olive oil, for brushing

Directions:

Preheat the oven to 400 degrees F.

Put the russet and sweet potatoes directly on the oven rack and bake 30 minutes.

Pierce each potato a few times with a fork and continue to bake until tender, 15 to 20 more minutes for the sweet potato and 20 to 25 more minutes for the russet potatoes. Let cool slightly.

Peel the sweet potato. Transfer to a bowl and mash lightly with a fork until almost smooth.

Trim a thin slice off the top of each russet potato, cutting lengthwise. Scoop most of the flesh into another bowl, leaving the shells intact.


Add the sour cream and butter to the russet potato bowl and mash with a fork. Stir in the scallions, 1/2 cup cheese, the nutmeg, 1 1/4 teaspoon salt, and pepper to taste.

Gently fold in the sweet potato.


Brush the potato skins with olive oil and season with salt and pepper.

Generously fill with the marbled potato mixture and sprinkle with the remaining 1/4 cup cheese.

Reduce the oven temperature to 375 degrees F. Place the stuffed potatoes on a baking sheet and bake until the cheese melts, 25 to 30 minutes.


Since I made these the day before I was serving them, I actually only baked them for about 22 minutes and then let them cool. I put them in a covered tupperware and refrigerated them overnight. When it came time to serve them, I stuck them in the oven at 375 for about 20 minutes until hot. I was worried they would get dry but they didn't due to the cheese and sour cream in the stuffing portion.

I also ended up having too much stuffing so I set it aside in another tupperware for us to eat as mashed potatoes one day!!

One change I made was using freshly grated Parmesan cheese instead of cheddar cheese. I was using a lot of Parmesan in other foods I was making for Yom Kippur dinner so I wasn't to keep it consistent and I thought the taste would mesh well. It did!!

I know these are a lot of work but I honestly can't tell you how delicious they are - coming from someone who never liked sweet potatoes and is just now starting to eat them in certain forms.

I give this a thumbs up and encourage you all to try it one day when you have some extra time. It's worth it!!

Thursday, September 16, 2010

Sorry for the delay...

Sorry this week hasn't been filled with many recipes - a new busy job is taking time to get used to and I am also busy preparing for having a few people over for the pre-fast for Yom Kippur.

There will be a lot of yummy (hopefully) recipes coming up after the Yom Kippur dinner so stay tuned!

In the meantime, browse through the notes on my Facebook Fan Page (Eating With A) for some yummy Argentine steakhouse recipes or leave me some ideas to make as Sunday Football game day snacks!!

I love the feedback some of you are already leaving me - thanks Lynda for all the baking ideas and new websites to look at!

Wednesday, September 15, 2010

Quick bite... cornbread!!


I don't know about you all, but sometimes I just need to cheat and I don't have time to make something from scratch.

Such was the case with cornbread the other night - and when I cheat with cornbread, I personally like the Jiffy brand - those little blue boxes!!

After I mix all of the ingredients, I let it stand in the mixing bowl for a while before I pour it into a pan or muffin tins so I get the maximum rise on the cornbread. I also will bake it a little less than suggested so it is moist and not dry. I feel when it gets too dry it gets crumbly and harder to swallow.

What are your favorite shortcuts?

Sunday, September 12, 2010

Honey Mustard Chicken and Apples


The following recipe is brought to you by the October Food Network Magazine!

While flipping through my latest issue of the Food Network Magazine, I came across this recipe and decided to try it.

My husband and I sometimes get a honey mustard chicken and pasta dish when we go to the diner so I wondered if it was similar. It is, but not entirely. The one in the diner is much sweeter, and I guess the honey mustard I have in the house has a different taste. Either way, it was good, and something we'll keep around for sure.

It takes about 40 minutes total to make.

Ingredients:
8 skin-on, bone in chicken thighs (2 to 2.5 pounds)
salt to taste
pepper to taste
2 tablespoons olive oil
1 large onion cut into chunks
2 cooking apples (ex: Cortland), cut into chunks
1 cup low sodium chicken broth
2 to 3 tablespoons honey mustard
1 1/2 teaspoons unsalted butter, softened
1 tablespoon flour
1 to 2 tablespoons roughly chopped fresh parsley

** Stay tuned below for ALL the changes I made to the ingredients!!

Directions:
Preheat oven to 450 degrees F.

Season the chicken with salt and pepper to taste. Heat olive oil in large ovenproof skillet over medium-high heat.

Working in batches if necessary, add the chicken skin side down and cook until golden, about 6 minutes. Flip and cook 2-3 more minutes, then transfer to plate. Pour off all but 2 tablespoons of the drippings.


Add the onion and apples to the skillet and lightly season with salt and pepper. Cook until slightly softened, about 4 minutes.


Mix the broth with the mustard, then add to the skillet and bring to a boil Arrange the chicken, skin side up, in the skillet.


Transfer to the oven and roast until chicken is cooked through - about 15-20 minutes.


Mix the butter and flour to form a paste.

Use a slotted spoon to transfer the chicken, apples and onion to a plate and bring the pan juices to a simmer. Whisk in about half of the butter-flour mixture and boil to thicken, 2 minutes. Continue to cook, adding more of the butter-flour mixture as needed to make a slightly thick gravy. Season with salt and pepper.

Pour over chicken and sprinkle with parsley.


Now, that sounds good, right? Well, we are not the biggest fans of chicken thighs so we actually just used boneless chicken breasts. They obviously cooked a lot faster in the skillet and we only left them in the oven for maybe 10 minutes at the most - our chicken breasts were thin sliced. Tasted good to us!

We also used Macintosh apples, mostly because they were incredibly on sale today at the store. I also halved the recipe, which was pretty easy to do.

Oh, and be careful when taking the skillet out of the oven. I used a pot holder to take it out, and then promptly touched the handle like, 2 minutes later to stir something! Ouch! Needless to say I have a little blister on one finger now. And to make matters worse, I did it another time too.. guess I didn't learn!

It was a very tasty dinner and we had a side of rice.

Give it a shot!

Sunday Game Day Snack


My husband is beyond excited about Football Sunday and is currently parked on the couch watching the Giants game while I do housework. Fair? Not really, but considering when I was home during the summer I watched a lot of TV instead of doing housework, well, I guess it's payback.

So to be nice, (and to try and help him gain a little more weight), I helped him prepare a game day snack after the first quarter.

We made nachos! Here is what we put on it:

Diced cubanelle pepper (it's like a bell pepper in taste)
diced scallions
jalapeno slices
cheese sauce with salsa (like the Tostitos stuff)
salsa
sour cream

We used brown rice chips and polenta chips because that is what we currently have in the house but I think he would have preferred tortilla chips. Either way, it came out really good with the chips we used!

First we placed the chips on a baking sheet and topped them with the cheese sauce, scallions and peppers.


After baking it at 350 degrees F for about 10-12 minutes, we topped it with the jalapeno slices, salsa and sour cream.

He grabbed another beer and settled in with his snack.

Enjoy football season!

Friday, September 10, 2010

Eclair Cake


The other night at Rosh Hashanah dinner, my honorary "big brother" made an amazing dessert - Eclair Cake. I LOVE eclairs so I was excited to taste it.

While I got this recipe from him, he originally got it from Paula Deen on the Food Network. And it is amazing!! By far my favorite dessert of the night! It's also incredibly easy to make - it's no bake.

Below is the recipe I got off the Food Network website.

Eclair Cake - Recipe courtesy Paula Deen

Prep Time: 10 min
Inactive Prep Time: 24 hr 0 min

Level: Easy

Serves: 20 to 24 servings

Ingredients
Cake:

* 1 (1-pound) box graham crackers
* 2 (3 1/4-ounce) boxes instant French vanilla pudding
* 3 1/2 cups milk
* 1 (8-ounce) container frozen whipped topping, thawed

Frosting:
* 1 1/2 cups confectioners' sugar
* 1/2 cup cocoa
* 3 tablespoons butter, softened
* 1/3 cup milk
* 2 teaspoons light corn syrup****
* 2 teaspoons pure vanilla extract

Directions

Butter the bottom of a 13 by 9 by 2-inch pan. Line with whole graham crackers.

In bowl of an electric mixer, mix pudding with milk; beat at medium speed for 2 minutes.


Fold in whipped topping.


Pour half the pudding mixture over graham crackers. Place another layer of whole graham crackers on top of pudding layer.


Pour over remaining half of pudding mixture and cover with another layer of graham crackers.

For frosting, blend together sugar and cocoa. Add butter and milk, mixing well. Add corn syrup and vanilla. Stir until creamy.


Cover cake with frosting and refrigerate for 24 hours.


**** If you don't want to use light corn syrup, you can substitute honey in the same measurement.


I made mini versions of this cake to take to a friends house tonight so hopefully they will like it as well!!

Enjoy!

Thursday, September 9, 2010

Eating With A Travels...to New Orleans, LA!!!


I almost feel sacrilegious writing about New Orleans. I have so many good friends from there or who have lived there, and I have only been a meager visitor. But I love it there, and have been 4 times which is 4 times more than many many people!

New Orleans is known for their cuisine. Creole, Cajun, and French cuisines play heavily into their culture. If you like seafood, especially shrimp or crawfish, New Orleans is your place.

But what I want to highlight today appeals to my sweet tooth. Simply put, one can not visit New Orleans without visiting the famous Cafe Du Monde and having their incredible beignets (pronounced Ben-Yays) - which are french doughnuts. If you know what fried dough is - funnel cakes, zeppole, etc. - those are all very similar to the beignet. Cafe Du Monde's beignets are square fried pieces of dough covered in powdered sugar.


Served in a basket of 3, these little treats are amazing and incredibly messy. If you are lucky to get a table in their little courtyard area, you should eat leaning over the table. Also expect to have powdered sugar all over your face, your lips and your clothes! Grab some coffee or hot chocolate to wash them down and you are good to go.


I've only been to the location on Decatur Street in the French Market area. There are a few other locations scattered around Louisiana as well. And you can ordered their dough here, but I have yet to do that.

So next time you find yourself in New Orleans, definitely stop by to have a delicious treat. While Bourbon Street is a big draw (and trust me, I should know after my adventures there!), Cafe Du Monde is worthy of your time too.

Until next time!

Wednesday, September 8, 2010

A Challenge for Me

So... I have to make a dessert for Saturday the 18th. I'm not great with desserts, so it's my challenge.

Anyone have any ideas to jump start my mind flow?


Also, don't forget to check out the Eating With A fan page on Facebook for some of the Argentine Steakhouse class recipes.

Happy Rosh Hashanah to all who celebrate it!

Monday, September 6, 2010

Broccoli Corn Noodle Casserole


Part of me feels like my dinner tonight will be out in the country. It's a very warm dish and by warm, I mean it's very much like a comfort food. I pre-made this last night because I am starting a brand new job today and wanted to have everything ready for when I got home! (My husband and I also baked up a storm yesterday making dessert for Rosh Hashanah dinners!)

So tonight's dinner is a Broccoli Corn Noodle Casserole with Ground Turkey. It was very easy to make!

Here are the ingredients:
1 (16 ounce) package uncooked egg noodles
1 pound ground turkey
1 (15 ounce) can canned or frozen corn
1 (10.75 ounce) can cream of broccoli soup
salt and pepper to taste


Directions

1. Preheat oven to 350 degrees F (175 degrees C). Lightly grease a medium casserole dish.

2. Bring a large pot of lightly salted water to a boil. Add noodles, cook for 6 to 8 minutes, until al dente, and drain.


3. Place turkey in a skillet over medium heat, and cook until evenly brown. Drain grease.


4. In a bowl, gently mix cooked noodles and turkey, corn, and soup. Season with salt and pepper. Transfer to the prepared baking dish.


5. Bake 20 minutes in the preheated oven, until bubbly.


This recipe is very versatile because you can use ground chicken or beef or cream of chicken soup or cream of mushroom. I love recipes with interchangeable ingredients like that!

I already took a taste and it's very yummy. I can also see sprinkling something on the top before baking, maybe some cheddar cheese or breadcrumbs. Or both!

We're going to be eating this with some good ol' fashioned cornbread. Yum! Can't wait!

Sunday, September 5, 2010

Cream Soda Cookies - sound familiar?


So, everyone I gave out my root beer cookies to gave me really good feedback on them so I wanted to try my other favorite soda - cream soda!! When we bought a bunch of extracts online to get the root beer extract, one of the ones we got was cream soda extract. So it's basically the same recipe, just substituting cream soda for root beer.

I have a feeling that cream soda extract is harder to get than root beer extract. While the stores around me didn't carry McCormick's Root Beer Concentrate, a lot of stores around the country DO (it would be in the baking section with all the extracts).

Cream soda extract is readily available all over the internet if you google it. We bought a lot of our extracts from here and they shipped everything really quickly. I have a feeling if you just use flat cream soda (maybe a drop more than in the recipe) and just regular vanilla extract (use a little more than required but not doubling up to replace the cream soda extract) then the cookies will still have a cream soda taste. But I can't prove that - I haven't tried it. I am guessing because cream soda has a very vanilla taste to it.

Anyway, here is the recipe again, this time with cream soda.

Cookies
4 cups all-purpose flour
1 teaspoon baking soda
1/4 teaspoon salt
1 cup granulated sugar
1 cup packed brown sugar
1 cup butter, softened
1/2 cup flat cream soda
2 large eggs
2 teaspoons cream soda extract or concentrate
1 teaspoon vanilla


Heat oven to 375F.
In medium bowl, stir together flour, baking soda and salt.
In large bowl, beat granulated sugar, brown sugar, butter, cream soda, eggs, cream soda extract and vanilla until well blended.
Beat in flour mixture just until combined.

Form dough into balls, about 1 1/2-inch diameter (using a rounded tablespoon of dough).
Place about 2 inches apart on cookie sheets. Bake 9 to 11 minutes or until lightly browned. (Do not over bake or cookies will be dry.)
Cool completely on rack.

Icing
1 1/2 cups powdered sugar
1 tablespoon flat cream soda
2 teaspoon butter, softened
1 teaspoon cream soda extract or concentrate

In small bowl, combine icing ingredients, with spoon, until smooth. Add more powdered sugar if too thin; add more cream soda if too thick. Spread on cooled cookies.

Makes about 4 dozen cookies

You can also try this recipe with coke and coke syrup, cherry extract and cherry coke, vanilla extract and vanilla coke... the possibilities are endless!! If you come up with something really yummy - let me know!!

Argentine Steakhouse Cooking!


Last night my husband and I along with another couple took an Argentine Steakhouse cooking class at one of the 16 Viking Cooking School locations around the country. We are lucky that there is one only 20 minutes from us since there are so few in the US and this was the 3rd class we've taken over the past few years.

The classes are really fun - usually between 3-5 hours and are just a one-time stand alone activity. Two years ago we did a French Pastry class and learned to make palmiers, cream puffs, eclairs, rum cakes and a few other treats. We then followed that class a few months later with an Ice Cream making class where we learned to make ice creams, sorbets, shaved ice and a few other things. That class was my husbands favorite, obviously.

This time around we chose this Argentine Steakhouse class with our friends as something fun to do on a Saturday night. The class was from 5-8 and you cook first and then get to enjoy everything afterward!

When we first arrived, there was an appetizer waiting for us of Grilled Chorizo on Crusty Bread with Chimichurri Sauce. We all got to sit down and eat as they explained what we would be doing in the class. It was the first time I had chorizo and chimichurri sauce and they weren't bad! The chorizo kind of tasted like a hot dog a little bit so I was fine with it. (I pointed out to my husband, the hater of hot dogs, that it tasted like one and he still shrugged and indicated he would never eat a hot dogs. Whatever!)

Then we started to cook! Here is what our menu was going to consist of:
*Argentine Empanadas (and learning how to make the dough)
*Roasted Marinated Sweet Peppers
*Grilled Skirt Steak with Chimichurri Sauce
*Oven-Roasted Potatoes
*Flan

We started on the flan first because it would need to bake and then cool and we only had a few hours. To make the caramel we simply browned some sugar and water in a skillet for a few minutes. I'd never done that before and it was neat to watch the sugar brown and turn into a caramel. (When eating it, we felt it needed to be a bit sweeter though). The custard part was just condensed sweetened milk, evaporated milk and eggs. Simple!

Next we charred our peppers. This was also the first time I ever charred food. We put 3 large red peppers directly on the gas range and let the flames blacken them. Once they were mostly black, they went into a large metal bowl and plastic wrap was used to seal it. The instructor told us that the moisture would soften the peppers to allow the char to be brushed off more easily later on.

A quick lesson in knife skills came next so we could chop up some of our ingredients for our empanadas. Then we chopped scallions, red pepper, parsley, onions and green olives.

When that was set aside, we cut up our Yukon Gold potatoes for our roasted potatoes. They cut pieces were mixed with paprika and olive oil and then roasted in the oven. Those were my FAVORITE part of the meal!! I never thought to use paprika on potatoes before.

Back to the empanadas. The instructor demonstrated how to make a simple dough with flour, shortening and ice water. Then we were sent to the stove to prepare the empanada filling. First we were told to brown our chopped beef. Once that was browned we drained the beef and in our empty skillets, were told to sweat our onions. We were also told to keep our freshly chopped parsley to the side because you always want to add in any fresh herbs last! Who knew! Dry spices can be mixed into whatever you are cooking or sauteing whenever but fresh herbs will lose their flavor if mixed in too early. Anyway, so the onions were sweating and we added in the rest of the ingredients that we had chopped and diced, also a few dry spices and currants! They wanted the empanadas to have a sweet and salty element. Some of the cooking groups also added in hard boiled egg but we didn't because my husband hates eggs and while I like them, I do not like hard boiled egg.

Once the ingredients sauteed up nicely we added the beef and fresh parsley back into the skillet for a minute and let the mixture rest.

Back on the prep table we chopped up some more ingredients for the chimichurri sauce and once it was ready, marinated our skirt steak in it. By that time, the dough for the empanadas was cooled and ready to work with so we set to work rolling out dough and cutting circles out. We stuffed our circles of dough and sealed the edges with a fork to get those fun ridges at the end. While the instructor took them away to fry, we started prepping the charred peppers!

The big bowl of red peppers came out and we all took one and put it in a ziplock bag. Then we were taught how to massage the pepper to rub all of the char off easily. Once most of the black was off in the bag, rinse the pepper under cool water for just a few seconds to get any remaining char off - but not too long or it will lose its flavor. Then we chopped them into strips and set them aside to eat later on. (I like roasted red peppers but I felt we should have eaten these warm, not room temperature!)

It was then time to grill our steaks! We were taught to always load your grill from back to front in case of flare ups - so your arm doesn't get caught in flames. We were also taught how to test for doneness of steak with the touch method. (We failed a bit on that...we thought our steaks were at medium to the touch but they were still rare. Back to the grill!)

Once the steaks were done, we gathered around the table and got to eat our creations! Steak, roasted red peppers, potatoes and empanadas, accompanied by a Creole Salad that was already made for us and some red or white wine. Our flan was dessert!

Delicious!

The Viking Cooking Schools always have really fun classes and they are worth the money for sure. If you are lucky enough to live in an area that has them, treat yourself to a class or two. But book early - classes are only 12 students each and they fill up FAST, especially the weekend ones. If you don't have a Viking School near you then find a location that does something like this. It's a different activity to do once in a while and it is fun to do with friends. This class was the first one my husband and I did with people we knew and we probably had more fun this time socially.

And I always enjoy learning new skills! Bring out the grill, it's time to char some peppers!

*** If anyone would like any of the actual recipes from this post, leave a comment, e-mail me at EatingWithA at gmail dot com or check my Facebook Fan Page (Eating With A). While I did not post them here, I have the recipe cards from what we made in class. My friend said the chimichurri sauce was AWESOME. She often makes her own but said this surpassed what she does in her own kitchen. Since I've never had it before, there was nothing for me to base it on, but it was pretty tasty.

Thursday, September 2, 2010

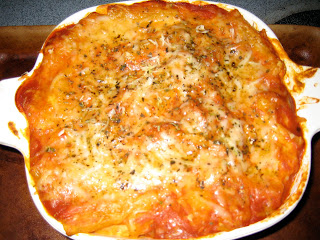
Easy Cheesy Baked Ziti


Sometimes you just need something fast and easy to make for dinner. I was in that situation the other night and I told my husband we were just having pasta for dinner. He came home expecting plain ol' spaghetti and sauce but as a last minute ditch effort, I decided to take a little extra time to make something more.

We had ricotta cheese in the house so I decided to make a three cheese baked ziti. I got my ziti noodles boiling and started in on the sauce mix. Here is the recipe:

(The following proportions are based on a 6-8 serving dish. Adjust to your specifications).

Ingredients

1 (16 ounce) package ziti pasta
24 ounces ricotta cheese
1 package shredded mozzarella cheese
1 (32 ounce) jar spaghetti sauce
1/4 cup grated Parmesan cheese
Italian Seasoning


Directions

Preheat oven to 375 degrees F.

Bring a large pot of lightly salted water to a boil. Add ziti and cook for 8 to 10 minutes or until al dente; drain.

In a medium bowl, mix ziti, ricotta cheese, mozzarella cheese, egg and 1 1/2 cups spaghetti sauce.


Lightly grease a 9x13 inch baking dish and spoon in ziti mixture. Top with remaining spaghetti sauce, followed by Parmesan cheese and Italian Seasoning.


Bake in preheated oven for 30 minutes; let stand a few minutes before serving.

Serve with some bread and you are good to go!