Showing posts with label game day appetizer. Show all posts

Sunday, November 13, 2011

Game Day Snack Week 10 - Cranberry Habanero Cheese Spread


Today's recipe is, if I do say so myself, absolutely delicious. I decided to make it somewhat Thanksgiving themed since Thanksgiving is coming up and people may also be looking for good appetizers to serve before the big feast. So I found a list of things I could make with what I had in the house with only having to purchase one or two things, since my husband and I are trying to budget this month and buy only what we really need.

My husband picked this recipe, which I got from the Taste of Home website. This recipe was originally called Cranberry Jalapeno Cheese Spread, but it became my own creation and renamed Cranberry Habanero Cheese Spread with the substitutions I made on a few of the ingredients, which I will discuss below.

I will be posting my version of the recipe, so if you want to go with the original version, use the link provided above.

This recipe is also very, VERY easy to make and takes about 20-25 minutes, plus a little cooling time. It is a fantastic dip for crackers, chips, celery or whatever you like using. It can be served warm or cool, and is great for tailgating or a party appetizer. (I myself am thinking about making this for Thanksgiving this year!)

The substitutions I made were because I didn't have an exact ingredient in the house, or because I don't like something, like jalapenos. That is my husband's thing. He likes spicy peppers. So instead, we decided to use the Mango Habanero jelly I have in the house to cook with from Really Good Foods. It was a good compromise because 1) I didn't have to go buy a jalapeno, 2) I didn't have to force myself to try and eat something with fresh jalapeno in it and 3) we both love this jelly which is sweet with just the right amount of kick, and when you mix it with the cheese, it cools it down a bit.

I also substituted Trop 50 Mango Pineapple juice for the regular orange juice that the recipe calls for, but only because that was the only citrus juice we had in the house. We debated buying a small travel bottle of OJ but in the end, decided the juice we had in the house would mesh better with the mango habanero jelly.

Otherwise, I used what the recipe called for. The end result was seriously, fantastic. I loved it! My husband and I ate it with some home made pita chips and celery, and we have a little left over which I will definitely be using for a snack at work this week. It's also a HEALTHY recipe! 2 tablespoons only equals 88 calories! So it's delicious, filling with celery and healthy. Can't beat that.

I think we'll be making this again in the future for sure. I liked it too much not to!

Enjoy!

And now, the recipe (remember, my version, not the original!)

Ingredients:

1 cup dried cranberries
1/2 cup packed brown sugar
1/2 cup Trop 50 Mango Pineapple juice
2 teaspoons Mango Habanero Jelly from Really Good Foods (or a spicy fruited jelly if you have one!) ** use more teaspoons for a spicier treat!
1 tablespoon lemon juice
1 teaspoon grated orange peel
1/4 teaspoon Chinese five-spice powder
1 package (8 ounces) reduced-fat cream cheese
Assorted crackers or vegetables


Directions:

In a small saucepan, combine the first seven ingredients.

Bring to a boil.

Reduce heat; simmer, uncovered, for 10 minutes or until thickened. (This could take less than 10 minutes, it did for me).

Remove from the heat; cool completely.

In a large bowl, beat cream cheese until fluffy. Beat in cranberry mixture until blended.

Serve with crackers or vegetables.

Yield: 2 cups.

Saturday, October 1, 2011

Game Day Snack Week 4 - PITACHOS!! (Pita Nachos)


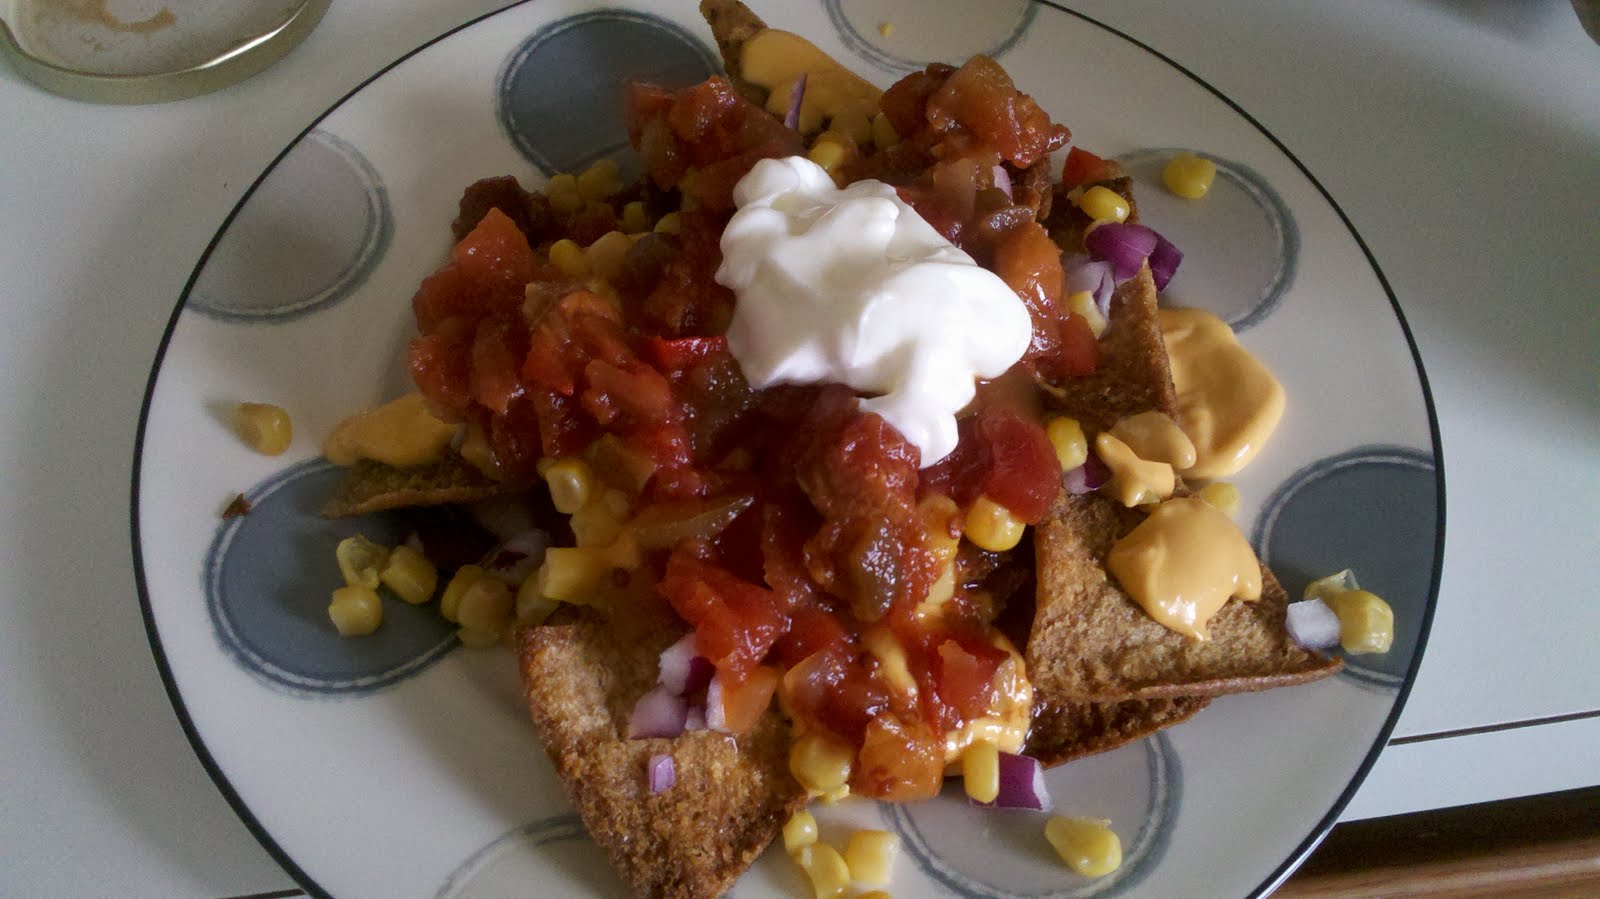
Nachos are ALWAYS a fun snack at our house. I made a few different ones last football season. So last weekend I decided to search through our fully stocked cabinets to create a snack for my husband. We had several different salsas in the house, canned corn, pita bread left from my Spaetzle Pizza and some other odds n ends.

I thought about making my own pita chips and then some kind of dip, but once I spied the taco seasoning, I knew what I was going to make... PITACHOS!! (Pita Nachos).

This recipe is very easy to make. It probably took me about a half hour from start to finish with making the pita chips and assembling the finished dish.

I decided to make this quickly, so I decided against opening the ground beef and sauteing it, so these are "vegetarian," per say. I can't claim it 100% because I don't know if any of the other products I used could be classified as non-vegetarian. I just know there is no meat!

First, I made the pita chips using the whole wheat pita bread I used for last week's recipe. I cut the pita into 8ths and dipped each piece lightly into olive oil. Once all the bread was dipped, I sprinkled some taco seasoning over the chips and baked them in the toaster oven for about 15 minutes until crisp. I did turn them over half way to make sure each side was dusted in taco seasoning and baking up nice and crispy.

While those were heating up, I cracked open a can of yellow corn niblets and heated them up.

I also diced some red onion very finely - just a little though. I didn't want to overwhelm the palate.

For the cheese, I used Tostito's Spicy Nacho Cheese dip. We had this 4 pack lying around the house because we bought it before Hurricane Irene hit us in case we lost power. The single serve travel packs were great because they didn't need refrigeration until opened, and you could finish one pack in a serving. So it totally worked as my cheese!

The salsa I used was actually from Canada. My parents went on vacation last year and brought us back a jar of Cherry Salsa from Prince Edward Island and we just never opened it. I decided to give it a try for this recipe. Any salsa will work, but if you can find a sweeter, fruity salsa, that would work best. We also had pineapple salsa from Trader Joe's in the house, but the cherry won.


A dollop of sour cream topped off the nachos, and I presented them to my husband with joy. He dug in and said "wow, these are actually REALLY good!" Score. I successfully made my own pita chips with a taco flair, as well as finally using a gift my parents got us a long time ago. I apparently made him too much and he couldn't finish, so I did, and surprisingly, I enjoyed it too, despite not really liking salsa.

I think PITACHOS will become a staple here in the future. I would have loved to add some scallions or jalapenos for my husband, but we just didn't have any in the house. I could also see adding some chopped lettuce. Maybe next time!!

So here is a rundown of the ingredients in case you missed anything in the description:

Homemade pita chips
(whole wheat pita bread, cut into 8ths, drizzled in olive oil and taco/fajita seasoning)
yellow corn niblets
red onion - finely diced
nacho cheese (Tostito's Spicy Nacho Cheese Dip)
cherry salsa from canada
sour cream

Assembly:

Place the baked pita chips on a plate and layer some corn and red onion over the chips. Pour some of the cheese on, and add a little more corn and onion.

Another splash of cheese, a few spoonfuls of salsa and a dollop of sour cream will finish off your PITACHOS.

Enjoy!

PS - serve with a fork too, just in case!

Saturday, September 10, 2011

Are You Ready For A Game Day Snack?! Week 1 - Deep Fried Goodness!


I'M BACK!! It's been too long since I have cooked. I am serious. I don't know what I have done all summer, but I have been incredibly lazy, and had zero desire to cook new foods. The little cooking I did resulted in pasta or things like that, which aren't exciting to post about. I'm still having some motivation issues (seriously, who stole my motivation?!) but I made an effort so I could bring back the football snacks!

This week's idea is seriously unhealthy. I mean, deep fried?!?! Blame it on Food Network though. They had a whole feature in this month's magazine about deep frying many different foods, and it looked just too darn good not to try at least once. So I figured I'd kick off the football season with a deliciously unhealthy, ooey, gooey, assembly of treats.

The batter I used was really easy to make, and it is so versatile to different seasonings. I split the batter 3 ways and actually used 3 different sets of seasonings based on which food I was frying. I could totally see making a batch of foods and putting them out on a tray for hungry football fans to eat while cheering on their respective teams.

For this post, we tried fried strawberries, Oreo's, mashed potatoes, mac n cheese and a slice of pizza. The pizza was actually on the article's "do not fry" list, but honestly, it was THE BEST THING WE MADE. OMG!!

Also on the "good to fry list" are things like peanut butter and jelly sandwiches, bananas, nuts, olives, cheesecake, Snickers, mini muffins and some other assorted goodies.

Some of the "do not fry" foods include M&M's, marshmallows, tomato slices, bologna, watermelon, as well as some other foods. Like I said, pizza WAS on that list (I guess maybe they mean regular pizza?? We used a specialty slice), but it turned out to be so delicious that I can't imagine why it's not good to fry.

There are a few different batters to use depending on your foods. I picked the basic batter because all the foods we wanted to play with used that batter.

Basic Batter:

1 cup flour
1 teaspoon baking powder
1/2 teaspoon salt
1 cup cold club soda

whisk together!

After you make the batter, you add in the spice blend you want, and I will talk about what I used for each food.

There is also a thin batter which uses just 1/4 cup more of club soda, and an egg batter, which is the basic batter with only 3/4 cup of club soda and adding in 2 egg yolks.

The only recipe they gave us using the egg batter was for the Snickers candy bar... everything else used the basic or thin batters. In fact, the only 2 things on their list using the thin batter is the PB&J sandwich and the bananas. So basic seems to work for most anything.

**You also need a pot with about 3 inches of vegetable oil (or peanut oil) heated to 375 degrees F.

And now, on to the goodies:

Strawberries:

Hull the strawberries, and add 1/2 teaspoon ground cinnamon and a teaspoon of sugar to the batter. (I actually used 1/2 teaspoon of cinnamon sugar and 1 teaspoon of cocoa sugar for a more chocolatey taste!!) Dip the strawberries in the batter and drop into the oil. Fry for 1 minute until golden brown.

My first attempt at the strawberry was so-so...we didn't fry it long enough and it just tasted like a hot strawberry. My second attempt was much better and it became more gooey, so it was sort of like biting into hot strawberry sauce. But it was delicious!

Oreo's:

We used the same seasonings that we used for the strawberries for the Oreo's. They came out fine - just like a fried Oreo should! I could see sprinkling some confectioners sugar on top of these and the strawberries as well. Oreo's get fried for 2-3 minutes.


Macaroni & Cheese:

Spread mac n cheese in a baking dish, chill and cut into squares. (I actually just put some in a tiny ramekin and stuck it in the freezer for a half hour to form a shape). Add a pinch of cayenne to the basic batter and fry for 1-2 minutes. I used paprika instead (we didn't have cayenne), and it was very tasty!


Mashed Potatoes:

Well, these would have been one of my favorites but my mashed potatoes leaked out of their batter shell and made a mess. I was so upset. The little bite we had left was SO delicious!! I'm not quite sure what happened, but the instructions are to chill the mashed potatoes and roll into balls. Use the basic batter with 2 tablespoons of chopped herbs. I decided to just use a pinch of dried parsley and a pinch of crushed red pepper flakes. Fry 2-3 minutes.

Pizza:

There is a restaurant near us called Pantano's and they make a very delicious pizza that consists of creamed spinach with mozzarella on whole wheat crust. We LOVE it. We had one slice left so I cut off the crust and used the batter I used for the mashed potatoes. We fried it for about 2 minutes and honestly, between the spinach, cheese and spices in the batter, everything worked so well, and my husband and I had to try SO hard not to eat it all in the middle of a random Saturday. My husband joked about going to get another pie to fry as well but we knew that would be even more unhealthy than we were already being!! Haha.


Despite us testing the waters before Sunday (I really wanted to get the recipe up for anyone wanting to make this for the game), and being really unhealthy, we also knew that without a doubt, if we had people over, we would make a few of these items to put out - especially the pizza and mashed potatoes (if I can make them right next time!)

So I hope you all are ready for some football (or party entertaining!) I promise I will try to come up with some healthier options as well for throughout the season.

Enjoy!!

Wednesday, April 13, 2011

Italian Night Part II - Pizza-like food!


So, continuing in what I made for Italian night with our friends and their 2 and a half year old, in addition to my pasta bake (and I also made my eggplant patties!), I made little stuffed pizzas.

Granted, they weren't the prettiest things on the table. I was trying to use crescent roll dough because we had a few tubes frozen in the house, and no pizza dough, but they weren't cooperating very nicely. Oh well - they still tasted fine. In fact, these little stuffed pizzas are perfect for game day appetizers too! I don't think they came out quite how I pictured... I am not sure what I was thinking. But, it worked, and it was easy!

I knew the little girl wouldn't eat my stuffed pizzas because 1) they probably looked really strange to her, 2) many kids are just picky to begin with, 3) there was some spinach in them which, many kids might not enjoy. So, I used something else we had in the house... our new Pepperidge Farm Goldfish Sandwich Bread!! (Comes in white or wheat).


The goldfish sandwich bread is basically like their deli flats, just in the popular shape of their goldfish crackers. I saw a coupon and ad for them last weekend and a store by us had the entire Pepperidge Farm line on sale so I sent my husband to get me a pack - he managed to grab the very last pack!! It was white bread, which is fine, I like that, but wished they still had some wheat left since I am trying to eat healthier these days.

Anyway, so I took half of the sandwich bread and I put a very light layer of sauce on it, and then some shredded mozzarella cheese. I used a pea for an eye and a green bean for the mouth (which I knew she would pick off, I just hoped she would still eat it since a vegetable touched it!). I baked it for about 10 minutes in the oven. When our friends arrived I showed the mom and she thought it was so cute, and she was so touched that I thought to make something special for her child. She said that many times people don't think about the kids and our friends got used to toting her food around - but they didn't need it at our house! Bunny pasta and fishy pizza did the trick.


The little girl DID pick off the veggies..."I'm taking the eye and mouth off..." but she ate the pizza - almost every bite! I was psyched. I don't have kids, but many of our friends do, and my husband's youngest nephew is quite the challenge during feeding time...I guess he'd rather play than eat. So to watch her eat my creation made me feel good. And my friend said to me, "your kids will eat when you have kids - you are so creative!" Well, I hope that is the case - I don't feel like fighting when them to get some nourishment!

Anyway, I digress - next up - my "stuffed pizza" recipe!

Ingredients:

1 tube crescent rolls
tomato sauce of your choice - jarred, homemade, whatever!
shredded mozzarella cheese
ricotta cheese
frozen spinach
olive oil
sesame seeds
crushed red pepper flakes

Directions:

In a bowl, mix together ricotta cheese, mozzarella cheese and spinach. Amounts are to your taste.

Unroll crescent rolls. Split into 4 rectangles and separate the triangle pieces. Match up the pieces that were stuck together as they will be the most even.

On one triangle, spoon a little tomato sauce on. Cover the sauce with the cheese and spinach mixture.


Then, place the matching triangle piece of the crescent roll dough up with the one that has ingredients on it. Seal all edges completely together.

Once the 4 little stuffed pizzas are done, brush lightly with some olive oil and sprinkle sesame seeds and crushed red pepper flakes on top.


Bake in a pre-heated oven at 400 degrees F for about 9-12 minutes, or until golden brown and slightly crunchy.

Sunday, April 10, 2011

Spicy Roll Up Appetizers


Hello again, fellow food lovers - sorry for a delay in posting some recipes. It was a busy week. I do have a lot to post, so hopefully I can get back on a regular schedule again.

The following recipe is one I debuted at our backyard BBQ in May of 2010 - also before I started my blog. I think I ended up making these because I had been searching for recipes containing cream cheese. Somehow, my husband and I had ended up with a large amount of cream cheese blocks and we just needed to use them. Therefore, several of the items we prepared for that BBQ contained cream cheese!

I saw a recipe that was close to the one I am posting now and knew it was easy and quick enough to throw together in the eleventh hour. It ended up being a tasty treat, especially for those loving spice, and even my husband liked them, despite him not liking black olives. He said they were chopped just enough that you couldn't really identify the taste as olives. (Personally, I think he has it in his head that he doesn't like some foods, really, and then is surprised when he does!)

So if you and your friends and family love a little spice or heat, try these out at your next party. Or make them, pack them in an ice filled cooler and bring them tailgating!

Ingredients:

1 (8 oz) package cream cheese, softened
1/2 cup black olives, pitted and minced
3 teaspoons of your favorite hot sauce
4 (10 inch) flour tortillas

Directions:

In a medium bowl, mix cream cheese with chopped olives and hot sauce.

Spread mixture in a thin layer over each of the tortillas.

Start at one and end gently roll each tortilla into a tight tube. Wrap each one in plastic wrap and chill until ready to serve.

Before serving, slice each roll into 1 inch thick slices.


** It's helpful if the tortillas are room temperature - they are easier to work with.